Can you help me find this?

Tags

, , , , ,

I’m sorry it has taken me so long to post. I am redoing several rooms in my home. Does anyone know where I might be able to find discontinued light fixtures? I am looking for two P2716-124 Progress light fixtures from the Chloe Collection. Here is what they look like:

If anyone has any ideas, I’d really appreciate it.

Thanks,

Laura

Melted Crayon Madness

Tags

, , ,

croppedI’ve seen these all over the Web and decided it was time for me to try melting crayons onto canvas. It was really fun and easy! I drew on my initial and painted the background blue. I then glued crayons to the top and covered the letter “L” with cardboard and painters tape to keep crayon wax from messing up my letter (Some wax still got into the letter but it wasn’t too bad). I painted the letter “L” with a pinkish-red color and outlined it with a black paint pen in an attempt to hide some of the wax on the edge of the letter. And voila, I have my very own personalized, melted crayon art.

~Laura

Getting into the Christmas Spirit

Tags

, , , ,

Plain Wreath
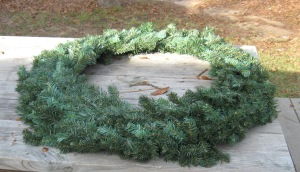
My mom and I decided to make wreaths together this year. We bought two plain wreaths and intertwined seasonal ribbon through them and added a bow. We twisted the ribbon into the wreaths instead of using glue and wrapped them with Christmas lights.

Bird Wreath (Day)On the first wreath, we added Christmas foliage and red birds. We also intertwined heart-shaped beads to look like berries (You can’t even tell they’re hearts!). I love this wreath; it looks so warm and inviting.


Ornament Wreath (Day)


On the second wreath, we added Christmas foliage and two, large Christmas ornaments that look cheerful and festive to welcome all our holiday guests.


Bird Wreath (Night)Ornament Wreath (Night)

                                  Merry Christmas,

                                                                                           Laura

Bowing Up, and then Back Down Again

So a while ago I posted about this bow necklace that I made for a friend of mine for her birthday. Well, I decided I liked the idea so much that I would make one for myself. This did not turn out the way I expected. First of all, I’ve been trying to get grad school applications in, and it’s hard to focus on something with RESPONSIBILITY looming in the back of your mind, poking you with a stick. But I made several different bows, trying different combinations of numbers of stitches, knitting, and purling to get a look that I liked. The three main ones are below. On the left is made with 4 stitches, knitting and purling every other row. The one next to it is also alternating rows with knitting and purling, just the other side, and its 6 stitches. The last is made by alternating stitches by knitting and purling and is 5 stitches. I don’t really like any of them that much, and I’m giving up.

bigger bows

I also promised a follow-up on the tattoo post. The original tattoo didn’t last the night for whatever reason, unfortunately. Once home, I did try the charcoal pencil technique, which transferred well, but when it came time to cover it with the liquid bandage it just smeared everywhere and looked like a giant, unappealing bruise. Next I tried just drawing on the tracing paper with the liquid eyeliner and slapping it on. It actually transferred and covered really well, but it had to be wet, so your design would have to be pretty simple unless you’re a super-fast drawer. So if you want to do an elaborate design, it still has to be somewhere you can reach to draw.

On an unrelated note: Yay it’s Christmas time!

xmas_tangled_lights_wallpaper_1024

~Emily

Ombre Bathroom Stand

Tags

, , , ,

Primed StandI am currently in the process of re-doing my bathroom. While that is nowhere near complete, I decided to make this post about one of the accessories that will be going into it when/if my bathroom is ever finished. I found this metal bathroom stand near a garbage can on move-out day in college and decided to take it home with me and use it the following semester. Since I am re-doing my bathroom anyway, I decided to try and paint this sucker. In my excitement, I forgot to take a picture of the plain metal stand but here’s a picture of it primed (you get the general idea).

Painted StandThe four tiers gave me the idea to paint the stand with various shades of one color. I picked red because I think it will look good in my made-over bathroom. The colors don’t look completely accurate on the computer. The first layer is light red and it gets darker on each tier below. I used a metal spray primer and then painted it with acrylic paints and protected it with an acrylic sealer. I like that this ombre stand was super easy to paint and will add a pop of color to my bathroom. Finished Stand

~Laura

One More Time!

Tags

, , , , , ,

I decided to line another bookshelf with gift wrap. This time I went for more of a country feel with this yellow, floral paper. I used the same method as before to adhere the wrapping paper (you can find that post here). This bookcase is also laminate, so I primed and painted it. Keeping in mind that I wanted it to look more country than the last bookshelf, I used the “dirty cowboy” technique from Domestic Imperfection. It’s hard to see the difference it made in my pictures, but it’s noticeable in person. It’s really apparent on Domestic Imperfection, so I suggest you go there and learn how to make your furniture grungy-chic.

~Laura

Thanksgiving Doesn’t Always Have to be About Turkeys

Tags

, , ,

First of all, Happy Thanksgiving!

In the tradition of the holiday, I suppose the thing I am most grateful for is….crafting! No, just kidding. It’s the clichéd stuff like family and friends (so boring, I know). I was originally planning on making some sort of Thanksgiving-related craft for this post, but let’s be honest. Hand turkeys and the like have been done to death. So I’m branching out into something more personal to me. Every year for as long as I can remember, my family and I have been going to the Gulf Coast to spend Thanksgiving in the relative sunshine and good times of an ocean-front hotel – something which also makes the “thankful for” list. Now, I don’t know about anyone else, but one of the first things that comes to mind when I think of the beach is all of those hokey, cater-to-tourists, henna tattoo parlors, and running up and down the beaches and boardwalks when I was younger with my cousins, all fake-tattooed because we were just that bad-A. And as it so happens, a couple of weeks ago I stumbled upon a tutorial for doing fake tattoos yourself, and have been looking for an excuse to try it out ever since. So for this Thanksgiving I’m tatting myself up and scaring grandma.

One of the reasons I liked this tutorial (http://charlotteisnotmyname.tumblr.com/post/11523186764/temporary-tattoos-tutorial) was because she used materials that I had on hand. The only thing I had to buy was the liquid bandage. For the design I decided to go with the iconic devil’s trap tattoo from Supernatural, because it’s one of my absolute favorite shows, and I’ve been on a kick rewatching the series. Of course, the downside of this was I decided to put it on my left side instead of on my wrist, reducing the ease of going over it with eyeliner, because to the uniformed viewer it looks slightly satanic, and I don’t need that kind of attention in my life. But anyway, here’s the pencil transfer.

It was extremely easy to trace the design and pencil it in, and it transferred to my skin pretty well with just a couple of seconds of wetting it. The hard part came next, when I was supposed to redraw the design in liquid eyeliner. The placement of the tattoo made it harder to reach than I thought it would, so I asked my mom if she would mind giving me hand. Of course, when I did this I neglected to remember that she’s never used liquid liner in her life, but, bless her heart, she tried. The end result came out a bit wobbly, but I don’t think it looks too bad.


When I get back home, I’m going to try doing the initial outline with a charcoal pencil to see if that will transfer a darker image, because I’d like to be able to skip the eyeliner step entirely. Using a sharpie pen failed miserably. I’ll also let you guys know how long it lasted. Again, the placement choice was a poor one because it’s already starting to crackle. Oh well! Live and learn.

~Emily

Wrapping Paper Lined Bookshelf

Tags

, , , , , ,

Lately, I’ve been on a furniture kick. I see all sorts of nifty projects online and think “I can do that” and it’s about time I try! So, when I saw this blog about how to line dresser drawers with gift wrap, I was inspired to get to work.

I decided to line the back of a bookshelf instead of the inside of drawers. I picked a laminate bookcase I’ve had for years with the idea that it wouldn’t be the end of the world if I completely screwed up this project. My mom had some leftover paint she wanted used up, so I decided to sand, prime, and paint my bookcase before applying the gift wrap.

Primed Bookshelf

I painted a little on the back so white would show through if my wrapping paper wasn’t quite big enough. Then I went ahead and sealed it with polyurethane, since it will be getting a lot of use. (I’d rather put in a little more work to begin with than have to do a lot more work later if the paint scratches.)

Now, the fun part! I cut the wrapping paper to fit the inside of the bookcase. I then used a foam brush to put a light layer of matte Mod Podge on a portion of the bottom of the bookshelf and fit part of the wrapping paper to it. I worked my way up in sections instead of putting Mod Podge on the entire inside.

Lined Bookshelf

This gave me a little more control over the bubbling and crinkling. After getting the paper in, I let it dry for about fifteen minutes then put a thin coat of Mod Podge on top of the paper. I repeated this process a few times letting it dry between coats and smoothing as I went. I had never used Mod Podge before, so I didn’t invest in a brayer but used an old ID card to smooth the paper from the middle to the outside. I imagine my method works on smaller projects, but I would go ahead and invest in a brayer (I don’t think they are very expensive) if you’re doing a larger project like this one, because I still had some bubbling. Even though I had some crinkling, it’s not noticeable unless you are looking for it and won’t be noticeable at all once there are books on the shelves.

The last thing I did was clean up the sides with an exacto knife and spray the back a few times with an acrylic sealer. I recommend doing this. The paper feels sturdier like it won’t rip with a lot of use. I love the fun paper on my upcycled laminate bookcase; it really brightens my space.

Finished Bookshelf

~Laura

Best Gift Ever!

Tags

, , ,

First, let me say what an awesome friend I have! Emily, thank you for making me that amazing Totoro. I love it! I’m sorry it caused you so much pain, but isn’t my happiness worth it? (Just kidding. We have to celebrate your awesome sewing skills.)

For any of you who don’t know, My Neighbor Totoro is a Japanese animated film by Hayao Miyazaki, and I loved watching it as a child. I’m not sure how this gem fell into my VHS collection (Yes kiddies, those are tapes. You say old; I say vintage!). It’s a great movie for kids with its colorful setting, catchy tunes, and magical creatures. I know I am biased, but I think it is one of the children’s movies that might not drive grown-ups insane if your child loves it. Then again, anything might make you go crazy if you watch it enough.

I painted this awhile back when I wanted to practice painting with acrylics. My theory was that Totoro seemed to be a pretty simple shape to draw and would still look cute if I messed up his lines a bit. It is definitely not my strongest painting. Notice he kind of leans to one side, but I think all the “mistakes” I made give him character.

I don’t notice ANY mistakes in your plushie, Emily. You are your own harshest critic. He looks so darn huggable! Thank you for my amazing birthday present.

~Laura